Appearance
Add Device
Valve Selector
To jump to a video explaining the Add Device button, click here.
Add Device is a button that allows you to access the Hydratec Valve Selector with over 2,000 available valves, from over 20 different manufacturers. Valves options range from Accelerators, Air Compressors, Alarms, FDC, Ball, and various trim options.
Summary
- Selecting Add Device will open Valve Selector. From here you can find various valves.
- After selecting the desired valve. It can be placed directly on a pipe, where it will cut into the pipe. Or in a project and then moved to the desired pipe.
- Most valves have two parallel connectors. These connectors allow the valve to cut into a pipe. Examples Angle, Butterfly, and Check Valves.
- Other valves such as FDC and Wall PIV don’t have the two parallel connectors. They either have one or more. Thus, you can’t cut directly into a pipe. The model will have to be placed into a project, aligned to the desired pipe, and then drag the valve to the open end of pipe.
- The valve can be rotated before or after its been placed on the pipe. Though if the valve has two more than the usual connectors, you will want to rotate before the connection.
- For more in depth ways to use Add Device, you can refer to the documentation pages below.
Example video of the Add Device Button
User Interface
Basic Layout

The top portion of the application window (above), henceforth referred to as the “title panel”, is used for applying filters, performing searches, and accessing different features of the application. You can move the application window by clicking and dragging this panel, or set its position to the center of your screen by double-clicking within any of the green areas.
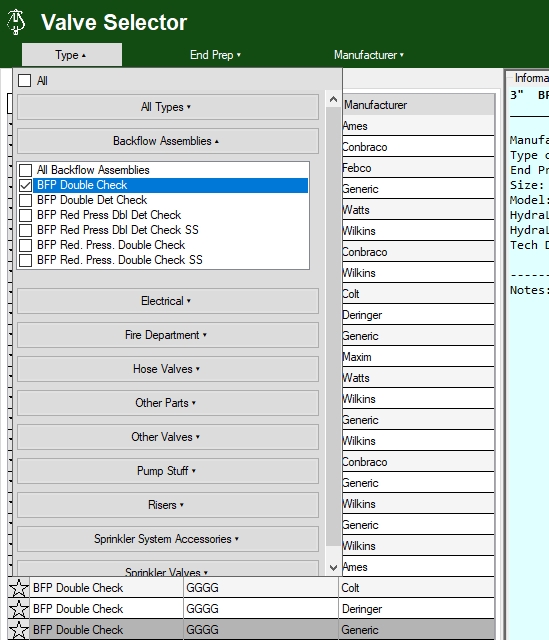
The main menu a) allows you to manage/apply custom presets, add/remove and view favorite devices, perform advanced searches, change application settings, and view help documentation and other information. To the right of the main menu are the minimize b), maximize c), and close d) buttons, which perform their usual functions.
The buttons below the title text, labeled “Type” e), “End Prep” f), and “Manufacturer” g), allow you to access lists of filters that can be used to retrieve more specific search results. The Quick search bar h) provides fast search results for specific text found anywhere within a device’s data.
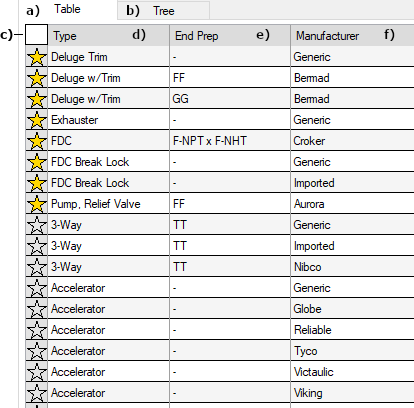
The results panel (left), is where broad selections are first made. Items in this panel are organized according to the general type of the device, its end preparation (labeled “-” if there is none), and its manufacturer. When filters or searches are applied, the number of items in the panel will change accordingly.
Results can be viewed as either a table, or a tree, which can be alternated between via the tabs at the top of the panel, respectively labeled “Table” a) and “Tree” b). Within the table view, results can be sorted by clicking the headers of each column in the table, either according to favorite devices c), type d), end prep e), or manufacturer f).
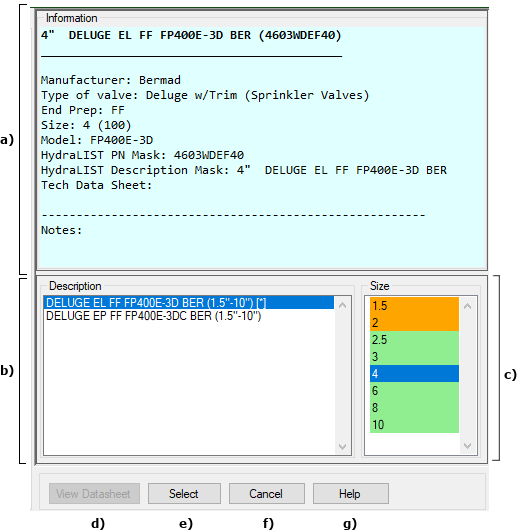
To the right of the results panel is the information panel (right), which is where you can view details about a device a), as well as files (such as models or technical data) associated with it. Once an item has been selected in the results panel, a number of product descriptions will appear in the description list b), along with a range of sizes that device is available in. Favorite devices will also be labeled by a bracketed asterisk (i.e., “[*]”). If an item in this list is selected, the size list c) will be populated, with each item color-coded according to whether a model file of the device currently exists in that size.
Below these two lists are four buttons: “View Datasheet”, which opens a list of available technical data sheets for the device; “Select”, which will either insert the device into a CAD file or perform a web search; “Cancel”, which closes the application; and “Help”, which displays help documentation.

Along the bottom of the window is a green strip containing a combination of icons and text (above). The first icon displayed on the left a) allows you to jump to your current selection in the results panel if you have navigated away from it. The next item b) displays the number of items currently listed in the results table/tree. The bracketed text c) contains the name of the currently applied preset. The graphic shaped like a list d) allows you to view your history; clicking the icon will open a text file containing the complete history log and clicking the arrow to the right will open a drop-down menu containing the 10 most recently logged actions. The final text on the right e) contains the full name of the currently selected device.
Views
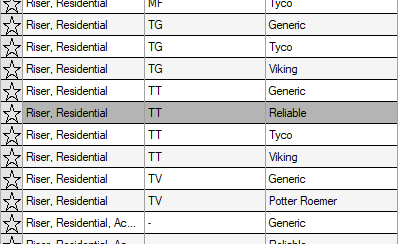
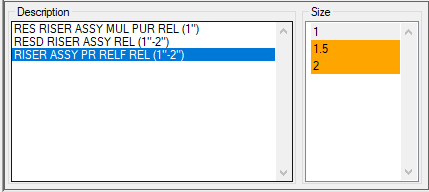
There are two primary components to the Valve Selector interface – the results panel (left) and the information panel (right). The results panel is where you can make categorized selections (organized according to the products’ type, end prep, and manufacturer), which will narrow down your potential choices to a selection of unique detailed descriptions – for example, you may want to view products of the “Riser, Residential” type, with a “Thread-Thread” end prep, manufactured by “Reliable”; upon selecting the row containing these terms, you will see several options in the box labeled “Description”, along with a range of sizes each corresponding product is available in. If you click on one of these descriptions, the box to its right (labeled “Size”) will be filled with all the available sizes you can choose from. Each size listing is colored according to whether or not there is a drawing file (.dwg) available for this product – products with drawings will be highlighted green, whereas products that are lacking drawings will be highlighted orange. Once a size is selected, the box in the upper-right corner (labeled “Information”) will fill with detailed information about the selected product; additionally, its background color will change to reflect whether a drawing exists.
Once a type, end prep, manufacturer, description, and size have been selected, you will have the option to click the “Select” button. The function of this button is dependent on if you’re running the Valve Selector as a standalone application, or through external CAD software such as AutoCAD or Revit. See the section on “Making Selections” for further details.
If there is a known datasheet file associated with the selected device, you will also have the option to click the “View Datasheet” button – this will open a new window with a list of available datasheets.
Filters
Clicking the three buttons above the Results Panel will open a list of filter options for that category. When items are selected in these lists, the filter is automatically applied and the listed results change accordingly. At the top of each list is an individual checkbox labeled “All”, which clears the list of selected filters for that category.
After choosing any filter, a new button with the text “Clear Filters” will appear next to the search bar. Please note that clicking this button will not prevent results from being filtered according to any searches you might have active; to ensure that you can see every device in the database, delete all text in the search bar (which will be subsequently replaced with the phrase “Quick search”) and click the search button (or alternatively, press the “Enter” key).
Making Selections
Results Panel
The Results Panel resides on the left half of the window and is used to narrow down your choices according to three primary categories – the type of device, its end preparation, and the name of the manufacturer that produces it.
At the top of the results panel are two tabs, labeled “Table” and “Tree”, each providing you with a different style of view for your filtered results.
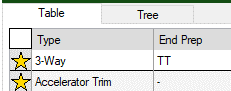
Table View
The table view is a two-dimensional grid containing four columns – the “Favorite” column, which indicates whether there are favorites that match the set of criteria contained in that row (normal rows will be marked with the outline of a star, whereas favorite rows will be marked with a yellow star); the “Type” column, which describes the general name for the type of device; the “End Prep” column, which contains an abbreviated form of the device’s end preparation (or a single dash (“-“) for devices that do not have end preparations); and the “Manufacturer” category, which contains the name of the manufacturer of that device (which may be non-specific, such as “Generic” or “Imported”).
Navigating the Results Table
The results table can be navigated using several methods – with the mouse, by clicking anywhere within the row you wish to select, or with the keyboard, either by using the up/down arrow keys or any character (typically a letter) that corresponds to the first character of each result (according to the column the table is currently sorted by).
Clicking the headers of any column will sort the table alphabetically by that category. By default, it is sorted by “Favorites”, which places all favorite rows at the top of the table, and then organizes everything alphabetically by Type, then End Prep, then Manufacturer.
When the results table is selected, pressing a letter key will take you to the next unique result that begins with the specified letter in the cell that corresponds to the currently sorted column. For example, if you have sorted the table by manufacturer and have a device by “Ames” selected, pressing the “A” key again will take you to the next row matching a Manufacturer beginning with the letter “A” that is not Ames – perhaps “Armstrong”. Hitting the “A” key again will jump to the next row containing an “A” manufacturer that is not Armstrong, such as “Aurora”. If you have reached the last manufacturer in the table beginning with “A” and press the key again, you will be returned to the first result matching an “A” manufacturer. To move backwards through the results, hold shift while pressing the letter key of your choice.
If you navigate away from your current selection and wish to return to that position in the table, click the HydraLIST icon in the lower left corner of the window.
Sorting By Column
Clicking the column headers in the Results Table will sort the results alphabetically according to the text in the specified column. Clicking the square button above the Favorite column will sort the results by first placing all rows containing favorites at the top of the list, and then sorting the rest by their values in the other three columns (considered in order, i.e., “Type”, then “End Prep”, then “Manufacturer”). With the exception of the favorites column, results can be sorted in ascending or descending order.
Tree View
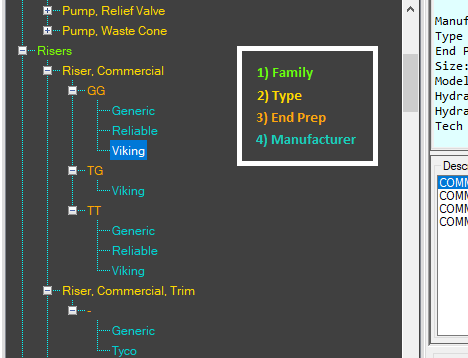
The results tree is organized similarly to the table view, with the added functionality of being able to expand and collapse groups of similar devices for clarity of organization. In addition to the Type, End Prep, and Manufacturer categories, there is an additional level – “Valve Family” – which categorically groups similar types of devices together (for example, the “Risers” family contains commercial risers, shotgun risers, as well as riser-related accessories).
Expanding and Collapsing Nodes
Sets of nodes can be expanded or collapsed by clicking on the plus/minus button to the left of their label with your mouse, or by hitting the left/right arrows on your keyboard. You can also double-click a node’s label to expand/collapse every child node that branches from it. To expand/collapse every node currently in the tree, you can click “Expand All” or “Collapse All” in the menu bar.
Color Schemes
Each category of the tree view can be color coded according to custom specifications, along with the background and lines connecting nodes. Applying a color scheme will affect the favorites tree as well as the results tree. Any number of custom color schemes can be created and saved for later use or reset to default at any time.
Creating Custom Color Schemes
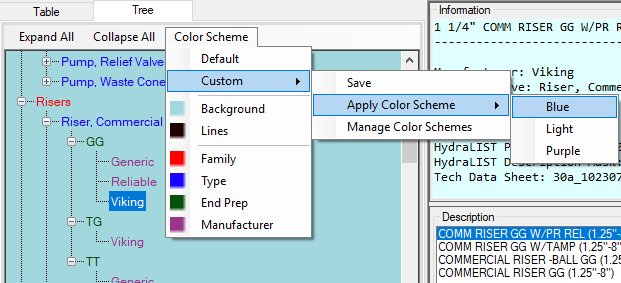
Clicking the “Color Schemes” item in the Results Tree menu will provide you with a drop down list of additional options. To create a custom scheme, simply click on any of the items containing a solid-colored icon to the left of its text – this will present you with a color selection dialog. Once you have specified the color you want, click “OK”, and the corresponding element in the tree will change to reflect your choice. These settings will be retained after closing and reopening the application, and will only be lost if you apply a different color scheme or reset to default without first saving the custom settings.
Saving and Applying Color Schemes
When you are satisfied with the color scheme you have designed, you can save it for future use. To do so, select “Custom” in the “Color Scheme” menu, and then click the “Save” option. A text box will appear prompting you to assign a unique name to your color scheme. If the name you have chosen already exists, you will be asked if you wish to overwrite the existing color scheme with that name. Keep in mind that color schemes (along with other application presets) can always be renamed later.
Once you have custom color schemes saved, you can apply them any time by selecting the item directly below the “Save” option (labeled “Apply Color Scheme”), which will present you with a drop-down list of all your custom color schemes. Clicking one of these items will cause a prompt to appear, warning that applying the chosen color scheme will cause you to lose your unsaved changes – choosing “Yes” will then overwrite the current color settings with the ones that correspond to the chosen scheme.
Managing Color Schemes
Color schemes can also be applied by choosing “Manage Color Schemes”, which will open a new window containing a list of custom schemes. From this window, schemes can be renamed and deleted by clicking the “Rename” or “Delete” buttons under the list.
Default
Color scheme settings can always be reset to default by choosing the “Default” option in the “Color Scheme” menu. Keep in mind that this action will overwrite your current settings, so unsaved changes to your custom scheme will be lost.
The Information Panel
Once a selection has been made in the Results Panel, the Information Panel (found on the right side of the main application window) will be filled with additional specifications and a complete collection of information about the currently selected device.
Description List
There may be a variety of devices that fall under the same set of categories, but vary enough to warrant further specification – for example, a manufacturer may produce different models of the same type of device. For this reason, every selection in the results panel will produce another list in the information panel, containing various descriptions of devices that match the chosen criteria. These descriptions may contain any number of details, such as type, subtype, model number, weight, etc. Many descriptions contain abbreviations, whose definitions can be referenced by choosing “Help -> Abbreviations” in the main menu.[1]
Additionally, descriptions will include a parenthesized range of available sizes for the corresponding device. Finally, favorite items will be marked with a bracketed asterisk (i.e. “[*]”).
Size List
Once you have chosen a description, the final list (labeled “Size”) will be filled with all available sizes for the corresponding device. Each item in this list will be highlighted according to whether a .dwg file currently exists in that size (green indicates a model exists, whereas orange indicates a model has not been created yet). Making a selection in this list will fill the box in the upper right corner with specifics about the selected device.
View Datasheet Button
Many devices have datasheets available; if this applies to the currently selected device, the button labeled “View Datasheet” will be enabled. Clicking this button will open a list of datasheets available for download. Simply choose the file name from the list that you want to open, and click the “View” button at the bottom of the window. If the file is already on your hard drive it will be opened immediately, otherwise it will be downloaded first. Note that files that have not been downloaded yet will appear italicized in the list.
Select Button
This button functions differently depending on several factors. If the currently selected device has a corresponding .dwg file (i.e., it is highlighted green in the size list) and you are running the application through CAD software such as AutoCAD or Revit, clicking the Select button will allow you to insert the model of the device into your project. If the device does not have a .dwg file, or you are running the Valve Selector as a standalone application, your default Internet browser will be opened and a search will be performed based on the most relevant details about the chosen device.
Searching for Devices
Quick Search
One of the most useful features in locating the ideal device for your project is the Quick Search, which is located in the upper right corner of the application window, directly underneath the main menu. In addition to providing fast search results, it has the ability to determine if a device’s text contains abbreviations of provided search terms; also, if recognized abbreviations are included in the search terms, devices containing the unabbreviated versions in their text will also be matched.
For example, if you were looking for backflow preventers by Victaulic – you could search “backflow preventer victaulic” or “bfp vic” and get the same results.
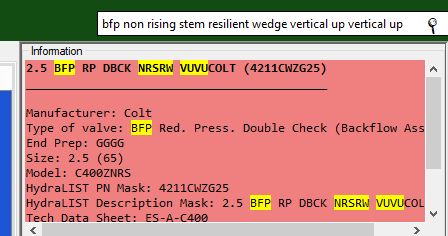
Once your search has been performed (either by clicking the picture of the magnifying glass on the right side of the search bar, or pressing the “Enter” key on your keyboard), any text matching your search terms will be highlighted in the information panel.
Advanced Search
Though the Quick Search feature should be sufficient for quickly finding the device you are looking for in the majority of situations, you may desire the ability to be very specific in terms of what is considered a match. Perhaps you want to find all Alarm valves with “G” in their end preparation, that additionally do not contain an “F” in their end preparation. The Advanced Search feature provides you with this flexibility and also lets you save your set of search parameters as presets for future use.
How To Use
To use the Advanced Search feature, select “Tools -> Advanced Search” in the main menu. A tool window will be opened containing: a field labeled “Criteria”; three buttons labeled “Add”, “Remove, and “New”; a checkbox labeled “Exclude products without drawings”; a drop down list of custom search presets with a button labeled “Save”; and two buttons labeled “Apply” and “Close”.
Clicking the “Add” button will add a new row at the bottom of the grid. Each row has three columns: “Field”, “Condition”, and “Value”. Clicking a cell in the “Field” column will provide you a list of data categories that you perform search logic on (such as type, size, model, etc.). Likewise, clicking a cell in the “Condition” column will provide you with options in terms of the logic you wish to apply to the data in that category. The third column, “Value”, is where you can enter the specific text you want to search for in the corresponding category. If you only want devices with .dwg files included in your results, you can click the checkbox labeled “Exclude products without drawings”.
If you want to remove the criterion contained in a given row from your search, select any cell in the row and click the “Remove” button. To create a new search containing no criteria, click the “New” button.
When you are satisfied with the criteria you have specified, click the “Apply” button to filter your results. 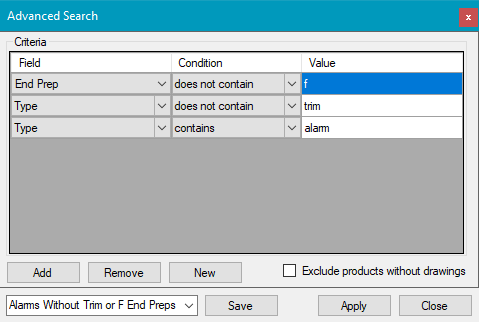
Search Logic
There are some notable differences in how the Advanced Search matches results compared to the Quick Search feature. Quick Search begins by splitting your search text into a list of individual words and then comparing each word against the text of every category in a device’s data; once a word is matched, it is removed from the list, and the search continues until the list is empty or a word without a match is found. If any word is left unmatched, the device is excluded from the search results. Phrases and combinations of words are only considered in matching abbreviations -- therefore, if a search for alarm valve” is performed, the search will consider a device with the description “DELUGE TRIM ALARM & TEST” to be a valid match due to the fact that it belongs to the type family “Sprinkler Valves”.
The Advanced Search, by contrast, allows you pick the specific category you want to search for any word or phrase. However, the comparison it makes is much more literal -- specifying that you want to search for devices with “accelerator trim” in the Description field will only return matches containing the complete phrase “accelerator trim”, and will exclude devices containing the phrase “trim for accelerator”.
Saving Search Presets
You can save lists of criteria as presets by clicking the “Save” button and entering a unique name into the textbox that subsequently appears. Once a preset has been saved, clicking the box to the left of this button will provide you with a list of search presets you have created, which can then be loaded by selecting their name in the list.
Any presets created using the Advanced Search tool will also appear in your primary list of presets (accessible by choosing “Presets -> Manage Presets” in the main menu, or pressing “Control + P” on your keyboard).
Favorites
There may be certain devices that you frequently use in projects or would like to keep track of for one reason or another. For this reason, you can maintain a collection of “favorites”, which can be easily located without having to search for them in the results panel. Favorite items are defined by the type, end preparation, manufacturer, and description, but exclude the size. Favorites are designated in the results table by a yellow star in the leftmost column, and in the description box by a bracketed asterisk (i.e. “[*]”) appended to the right of their description text. Additionally, favorites can be viewed separately from the standard list of results by using the “View Favorites” panel.
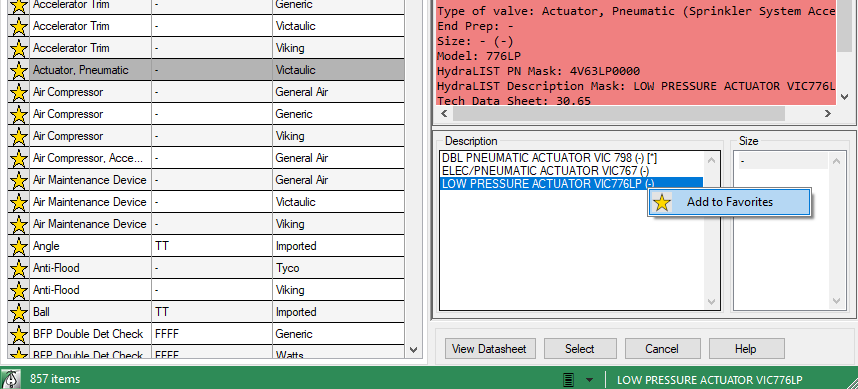
Adding/Removing Favorites
Adding and removing favorites can be done in a variety of ways. After you have made a selection, click the “Favorites” item in the main menu, which will open a new menu with the option “Add to Favorites” (or “Remove from Favorites” if the selected device is already favorited). Upon adding a favorite, the star in the leftmost column of the results table will turn from gray to yellow, and a bracketed asterisk will appear next to the selection in the description list. This action can also be performed by right-clicking the item (in the description list, the results table, or results tree) and then clicking the text in the box that appears. Once a favorite has been added, it can be found in the View Favorites panel.
Sifting through favorites can be greatly simplified by viewing them in the View Favorites panel (which can be accessed by choosing “Favorites -> View All” in the main menu, or by pressing “Control + F” on the keyboard).
Upon opening, the View Favorites panel replaces the Results panel on the left side of the window. The Information panel (the right side) remains the same, except that the Description list disappears. The View Favorites panel supports two view types (List and Tree) which are accessed by way of the two tabs located below the “Type”, “End Prep”, and “Manufacturer” buttons in the upper-left corner of the window.
At the bottom of the View Favorites panel are two additional buttons labeled “Remove” and “Close”. The “Close” button will close the panel and return you to the standard view; the “Remove” button will remove the selected favorite from the list.
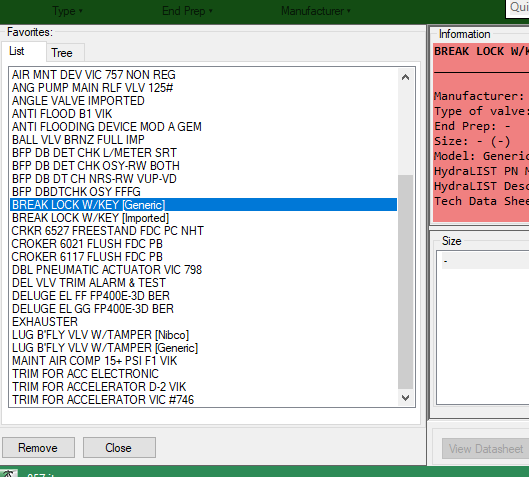
List
The favorites list lists the descriptions of all favorited items in alphabetical order. In the case of duplicate descriptions (for example, there may be a generic version of an identical device produced by a specific manufacturer), then the fields that distinguish them will be added to the right of their description in the list (e.g., “LUG BUTTERFLY VALVE WITH TAMPER [Nibco]” and “LUG BUTTERFLY VALVE WITH TAMPER [Generic]”).
Once an item is selected in the list, the size list on the right is filled, and the functionality is identical to the application’s standard view.
Tree
The favorites tree functions similarly to the results tree, except that the root nodes of each branch begins with the device type (as opposed to family), and ends with description (as opposed to the manufacturer)
Customizing Valves and Devices to have more than two outlets
A short summary of how to add more than two outlets is:
Add a pipe connector to your valve or device as follows:
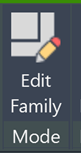
- Right click on the device and choose Edit Family
- In the Family Editor orbit the model (Shft + Mouse Wheel Button) to identify the face to add a connector to
- Use Create… Connections… Pipe Connector… to add connector to appropriate face (you will likely need to use the tab key to be abled to select a circular face od a cylinder)
- Select the new connector and change it’s Diameter property to 2” (or whatever you desire) and change the System Classification Property to Fire Protection Other
- Use Modify… Family Editor… Load into Project and Close… to return to your project
- Draw your new piping off of that newly created connector
Alternatively, if you'd prefer to listen to these instructions in video form, feel free to click the link to the video, here.
Fixing a Missing Pipe/Fitting Connector
Example Below: 2" Floor Control Valve with 1” Test & Drain
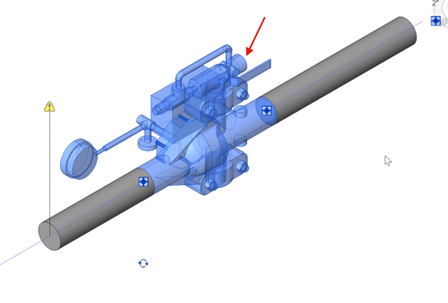
1. Edit the Valve
- Select the valve and click the "Edit Family" button
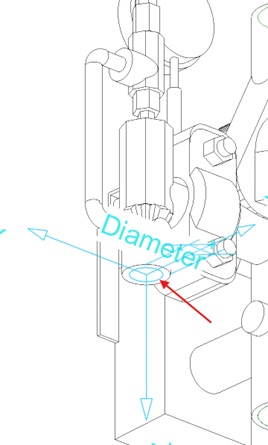
Before adding the connector, position your view to clearly see the attachment area. Use the view cube in the top right corner of the screen to rotate your perspective.
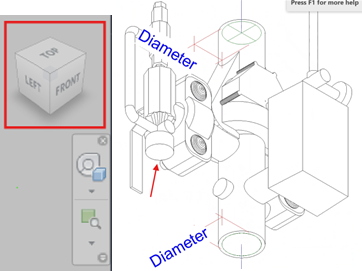
2. Add the Connector
Navigate to the Create tab
Click the "Pipe Connector" button
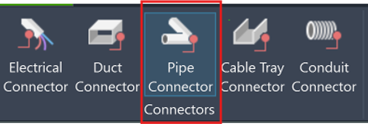
To find the correct face for attachment, hover your mouse near the desired area and press Tab repeatedly until you highlight the intended face.
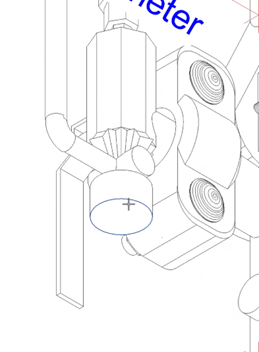
Example of tabbing sequence:
Tab 1: [First selection]
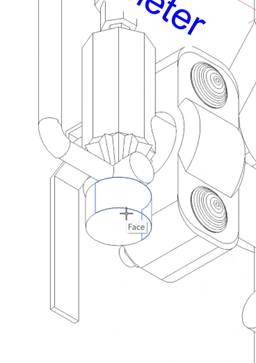
Tab 2: Face found
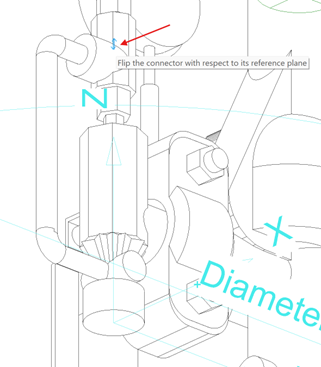
3. Verify Connector Direction
After inserting the connector, check that its direction is correct, using the Z axis. The connector direction indicates where your pipe will run - you want it coming out of the valve, not going through it.
Example of Z axis wrong directions:
Wrong Direction
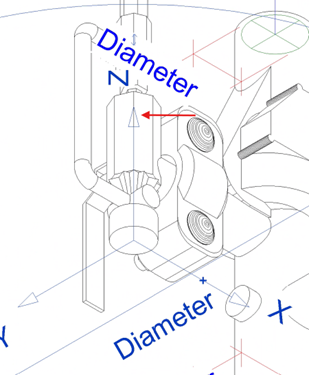
To change the axis, you will need to select the Flip reference plane element.
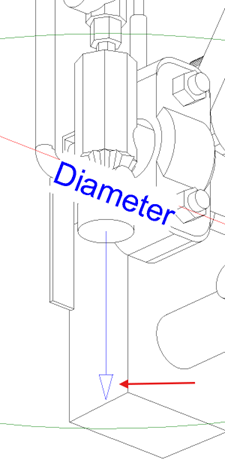
Correct Direction
4. Adjust Connector Size
The default connector size is 2'. To change this:
Select the Connector Elements (large circle)
Go to the Properties toolbar
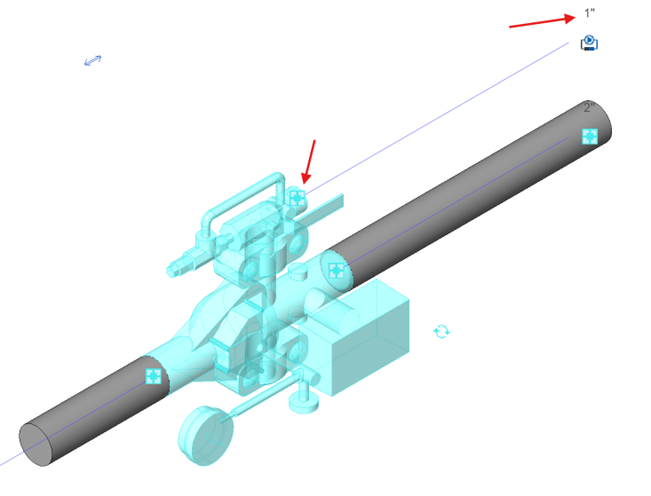
Under Dimensions, change the size to your required measurement (for this Test & Drain, use 1")
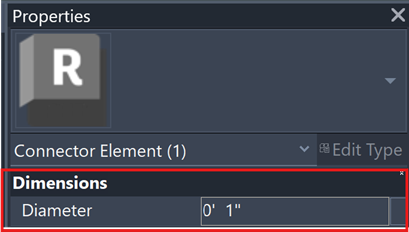
You'll see the connector size update accordingly.
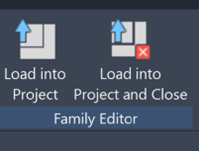
5. Load into Project
Your valve is now complete. Click the "Load into Project" button.
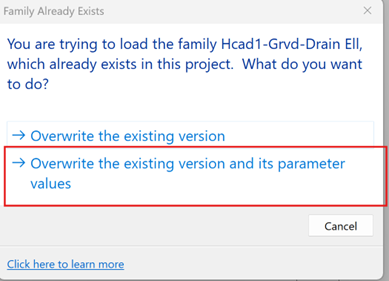
When prompted, select "Overwrite the existing version and its parameter values."
Your Valve will now have the new connector available to add a pipe.
Note: If you encounter a broken valve from the Valve Selector that's missing a connector, reach out to [email protected] and the team will be happy to help.
Presets
Presets allow you to save filter/search settings for future use, allowing you to retrieve specific sets of filtered results instantly. Note that only one preset can be applied at one time -- attempting to load a second preset after one has already been applied will replace the results of the first with the results of the second.
Types of Presets
There are two types of presets -- “Filter” and “Advanced Search”. Filter presets save all of your currently selected filters into lists, as well as whatever custom text (if any) is contained within the “Quick search” bar; Advanced Search presets save the list of the parameters you specified using the Advanced Search feature. These two types of presets cannot interact with each other (i.e., applying a preset that was created while using the Advanced Search will not include whatever additional filters you had selected at the time).
Saving Presets
Filter
Within the standard application view, select the desired filters you wish to save as a preset. If you want to include your Quick search text in the preset, enter it into the Quick search bar and perform the search (either by clicking the button shaped like a magnifying glass or by pressing the “Enter” key on your keyboard). A text box will appear prompting you to name your new preset. After providing a name for your preset and pressing the “OK” button, your new preset will be created and saved for future use.
Advanced Search
When using the Advanced Search feature, create the desired list of parameters and then click the button labeled “Save”. A text box will appear prompting you to name your new preset. After providing a name for your preset and pressing the “OK” button, your new preset will be created and saved for future use.
Managing Presets
A full list of all presets can be accessed by selecting “Presets -> Manage Presets” in the main menu (or by pressing Control + P on your keyboard). The Manage Presets window will open, which contains a list of all of your presets organized alphabetically by name.
To apply a preset, either select it from the list and then click the “Apply” button at the bottom of the window, or simply double click its name in the list. You will be prompted that continuing will overwrite your current filter settings -- select “OK”.
To rename a preset, select it from the list and click the “Rename” button. Enter the new name in the text box that appears, and then click “OK”.
To delete a preset, select it from the list and click the “Delete” button, then click the “OK” on the prompt that appears.
Applying Presets
Advanced Search presets can be applied directly in the Advanced Search window by opening the drop -down list in the lower-right corner and selecting the desired preset’s name from the list. After the preset’s parameters have been loaded into the table, simply click the “Apply” button in the lower-right corner to perform the search.
Filter presets (in addition to Advanced Search presets) can be applied within the Manage Presets window (see section titled “Managing Presets” for more information).
History
It may be useful to log your actions while using the Valve Selector. Depending on your current settings, Valve Selector can keep track of selections you have made, searches you have performed, files you have opened, as well as changes to your favorites and presets.
Types of History Items
There are a variety of different actions that can be logged in your history:
Selections: This includes every time a device is selected (regardless of whether or not the “Select” button was clicked).
Searches: This includes any search performed in the Quick Search bar or the Advanced Search window. Quick searches will be labeled by the search text that was entered, and advanced searches will simply be labeled “ADVANCED SEARCH”.
Favorites: This includes every time an item is added or removed from your favorites.
Presets: This includes every time a preset is saved, deleted, or renamed.
Files: This includes every time the user attempts to open a data sheet or model file.
Viewing Your History

Contained within the green strip at the bottom of the main application window is an icon shaped like a sheet of paper -- clicking directly on this icon will open a text file of your complete history log; clicking the triangle to the right of this icon will open a drop-down list of your ten most recent logged actions.
Clicking on an item in your recent history list will either open a file or perform a quick search based on its corresponding text depending on the type of history item chosen.
Changing Application Settings
The options window can be accessed via the main menu (“Tools -> Options”). Here you can specify how the application displays text, interprets device sizes, logs history, checks for updates, and handles quick searches. 
History Options
History settings affect the types of actions that are logged and how long history items are kept in the log before being deleted.
Maximum length: The maximum length (in terms of history items) of the history log (enter 0 for indefinite length).
Remove items after: The maximum number of days that logged history items are kept in the log (enter 0 to never remove items).
Save history data for: The types of history items that will be logged (see section titled “Types of History Items” for more information).
Data
These settings relate to how application data is accessed and updated.
Use local data path: Typically, product models are stored on the cloud until they are selected, at which point the application downloads them to your local drive. This option enables users without a network connection to store their files locally from the start, which bypasses this process. If you enable this option, the application will look for all drawing files in “\HES\HydraVALVE\VER55\Data\Object Files”. It is recommended to leave this option unchecked unless you are certain it pertains to you.
Automatically check for:
Here you can choose if the application will check for new updates when it is launched. You may wish to disable these settings if your web connection is slow and the application takes too long to load.
Updates to product database: Database updates occur when new devices are added or existing ones are modified. These updates are generally important, so it is recommended that you leave this option checked unless your connection is very slow.
New product drawings: Check this if you want to be informed when new device models have been created.
Other Settings
Display valve sizes as: Changes the way the application displays device sizes.
Font size: Allows you to increase the size of the text in the application.
Show obsolete products: Allows you to exclude products that are no longer provided by the manufacturer from results.
Search for abbreviations: Allows you to disable the feature that interprets abbreviations in Quick Search results, which can increase search speed. Since many items in the database exclusively use abbreviations to describe certain things, it is recommended that you keep this setting on.
Additional Help (Videos and additional resources)
For more help regarding the Add Device button: click here
For other help that might be relevant to Add Device: click here
HydraCARDs (Troubleshooting)
For HydraCARDs regarding the add device button: click here
For other relevant HydraCARDs: click here