Appearance
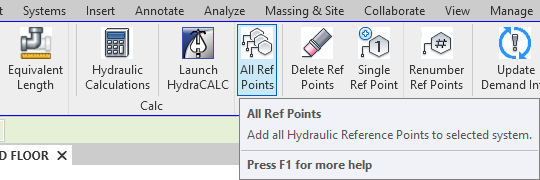
All Ref Points
To jump to a video explaining the All Ref Points button, click here.
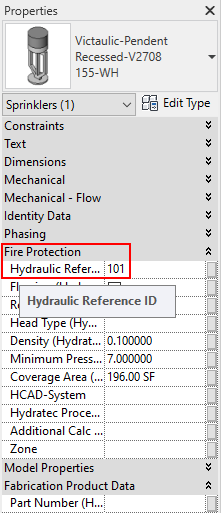
All Ref Points is used to insert reference points into Revit 2D and 3D drawing or plan in bulk via the press of one button. The button will take the Hydraulic Reference ID property of any fitting and assign it as a reference point in the drawing. This can be done manually by editing the Hydraulic Reference ID, the location of this editable property shown below, or by using the Reference IDs automatically assigned to fittings when using the Hydraulics Calculations button.
When returning after completing a Hydraulic Calculation, it will notify the user via dialog box that it has placed reference points, and if any are still needed to be placed.
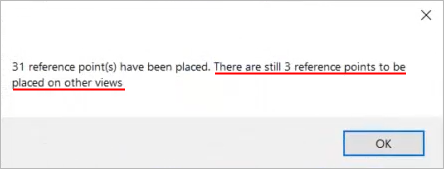
If this is the case, it is typically caused by these reference points needing to be placed in a view that is not currently open. Open the view where the fittings the reference points are supposed to belong to, and click the All Ref Points button and it will place the remaining ones at their intended locations.
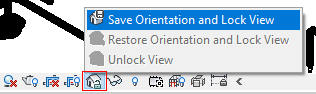
It is also possible to put reference points in a 3D View, however, it must be a locked 3D view. This means the orientation must be set in place, so it cannot be moved again. This can be achieved by selecting the  Unlock / Lock 3D View button on the bottom of the screen when looking at a 3D View.
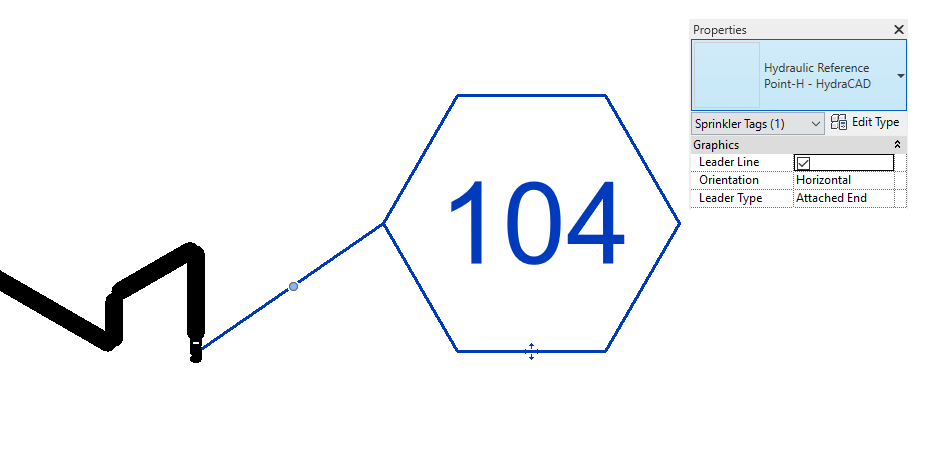
Once the view is locked it place, reference points can be placed down by pressing the All Ref Points button. To make the view less cluttered, it is also possible to move the reference points away and add 'leaders' to the reference points, creating a line between it and the fitting it was assigned to.
This can be done by clicking and dragging the reference point into clean and open space, and clicking on it and checking the Leader Line property, shown below:
Summary
- All Ref Points adds reference points to the project according to each fittings' Hydraulic Reference ID.
- The location of this property is located under the Fire Protection section of each fitting, shown in the detailed description above.
- Therefore, each reference point can be named manually by entering the ID in this property. They can also be set automatically when running Hydraulic Calculations by providing it the starting point to count up from. (Example: 200 to 201, 202, 203, etc.)
- Hydraulic Calculation will automatically apply reference points into the view after returning from calcs, but it will inform the user if any reference points are missing from other additional views. Going into that other view, then clicking All Ref Points will insert them accordingly.
- If trying to add reference points to a 3D View, the view's orientation must be locked in place.
- This can be done by clicking the icon looking like a house with a lock icon, shown here: and selecting Save Orientation and Lock View
- This can be done by clicking the icon looking like a house with a lock icon, shown here:
Example video of All Ref Points Button
How Do I Use The Button?
Either enter Hydraulic Reference IDs manually, the location of the property shown above, or assign what number to start at and have them generated automatically using the Hydraulic Calculations button.
If there are reference points currently not present in the 2D or 3D view that are needed to be there, click the All Ref Points button. They will be added to the project if all the criteria needed is met, which can be read about above.
Additional Help (Videos and additional resources)
For more help regarding the All Ref Points button: click here
For other help that might be relevant to All Ref Points: click here
HydraCARDs (Troubleshooting)
For HydraCARDs regarding the All Ref Points button: click here
For other relevant HydraCARDs: click here