Appearance
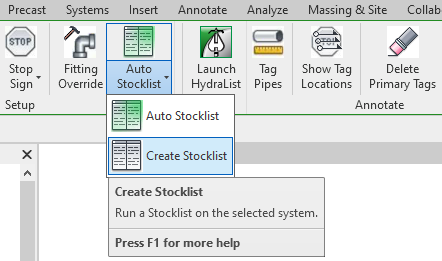
Create Stocklist
To jump to a video explaining the Create Stocklist button, click here.
Create Stocklist is used to, as the name implies, create a stocklist of the pipes and fittings used in the fire protection plan. Prior to running the stocklist, certain prerequisites must be met in order for it to function properly, those are detailed: here.
After a successful running of the create stocklist command, it will open the HydraLIST standalone application, supplied with information from Revit, to review the stocklist.
Summary
- Warning: Prior to running Create Stocklist, some prerequisites must be met, detailed: here.
- Click Create Stocklist
- Make sure the boxes / sections for Heads, Pipes, Hangers and Options is lit up green.
- If they are not, either manually enter the information in those sections as desired, or click Load Defaults, as seen here.
- Once all the information is correctly mapped, click Continue and run the stocklist.
Example video of Create Stocklist Button
How Do I Use The Button?
Prerequisites
Prior to running Create Stocklist, ensure that the fire protection drawing meets the following prerequisites:
- At least one pipe, or run of pipe, must be assigned a LISTing tag. This can be done via the Tag Setup command.
- While not required, it is recommended this is done in a Fabrication View for ease and to avoid clutter in the project.
- A stocklist cannot pass through, or list through mechanical equipment (Example: Pumps).
- A Stop Sign can be placed to indicate where the listing process should end.
If all of this is satisfied, click Create Stocklist.
It will open up a new window, which will require additional information on the first running of Create Stocklist.
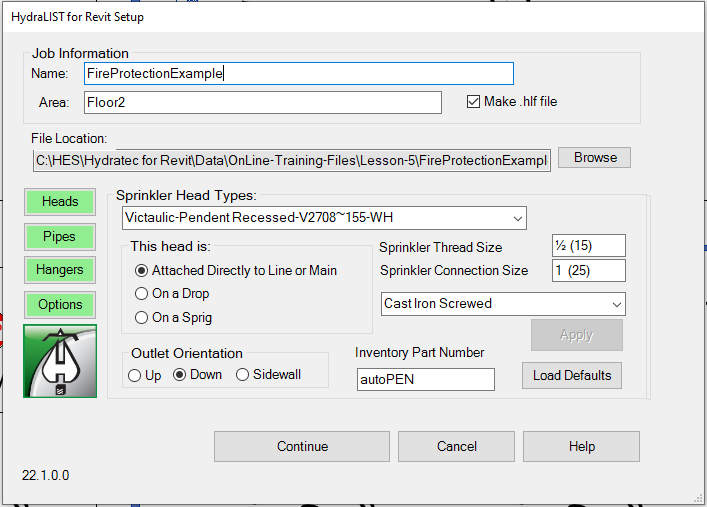
If any of the boxes or sections labelled *Heads, Pipes, Hangers and Options is not lit up green, they require information to be mapped to them before proceeding.
By clicking on the boxes in question, the information in those sections can be manually entered to the user's specifications or done automatically by clicking Load Defaults as seen below. After making any changes, click Apply to ensure that at the end of the information mapping process, the greyed out Continue button will become selectable again.

Once all of this is completed, the Continue button should be selectable whereupon clicking, information will be transferred to the HydraLIST standalone application where the newly created Stocklist can be reviewed and changed if need be.
Additional Help (Videos and additional resources)
For more help regarding the Create Stocklist button: click here
For other help that might be relevant to Create Stocklist: click here
HydraCARDs (Troubleshooting)
For HydraCARDs regarding the create stocklist button: click here
For other relevant HydraCARDs about create stocklist: click here