Appearance
Using the HydraCAD Toolbars
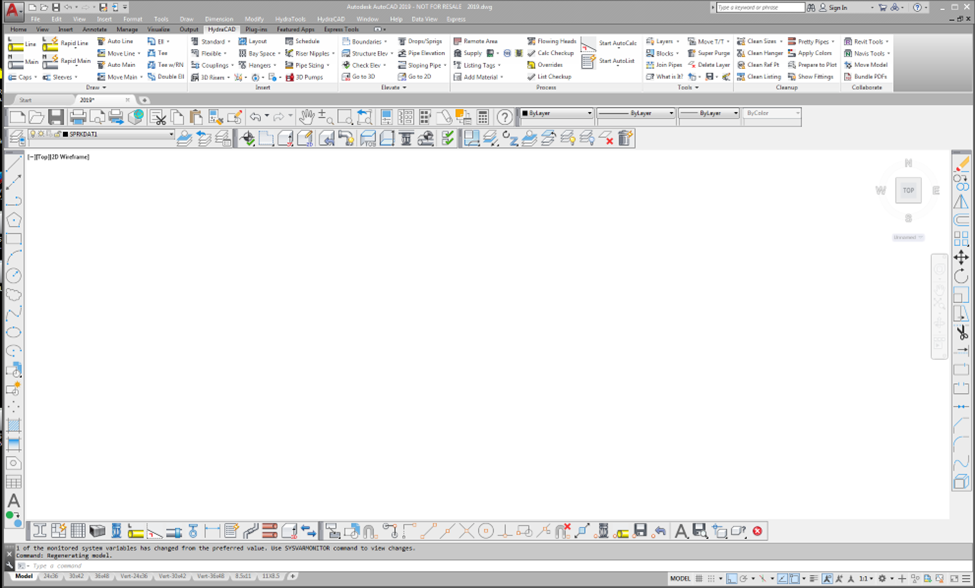
With the HydraCAD Standard Workspace, the opening screen displays common HydraCAD and AutoCAD toolbars, ribbons and menus along the top and sides. Buttons are provided for saving and opening files, undoing, redrawing, and a variety of zoom commands. Be sure that you are comfortable with these functions. Refer to AutoCAD Help if needed.


The first is the HydraCAD Menu toolbar. Use this toolbar to open the major component toolbars that are also found in the HydraCAD pull down menu. If not present, it can be opened from the HydraCADs pull down menu.

For example, if you press the Display Steel Toolbar button on the left, the Steel Toolbar will open as shown here. The Steel Toolbar has several buttons for inserting building structural components such as columns and beams.
Tip - Opening a toolbar from the HydraCAD Menu toolbar will turn on all the layers corresponding to that toolbar. For example, opening the Steel toolbar from this menu toolbar will turn on all Steel related layers, even if the Steel toolbar is already open. This makes it easier to work with the drawing because you do not have to memorize layer names.
These toolbars can also be selected from the HydraCAD pull down menu at the top of the screen. The second toolbar is HydraCAD Utilities. If not present, it can be opened from the HydraTools pull down menu. It gives you access to many basic AutoCAD and HydraCAD operations.

The toolbar button on the far left is used to move and copy objects.

Pick and hold this button with the left mouse button to reveal other buttons. This type of submenu is called a fly out. Fly outs can be accessed from any button which has a black triangle in the lower right corner. To select an option from the fly out, leave your mouse button depressed and move over the desired button. Release the mouse button to activate the command.

The MOV T->T and CPY T->T commands will move and copy a single object quickly and without the need for specifying a base point, but they are not to be used with pipe sizes or hangers. Make it Be and Make it Be w/Dim are used to move objects from a referenced point and in the latter case, add a dimension from that referenced point to the new point. Use AutoDIM to quickly dimension and object with just two pick.
Tip - These three commands are especially helpful when making field changes to a drawing.

The second button from the left is for inserting blocks. This is an AutoCAD command that allows you to insert blocks or other drawings into your current drawing. The third button is to set up the running OSNAP settings. This is another AutoCAD command. The Drafting Settings dialog box will open to the Object Snap tab where one or more snap options may be selected.
The tracking button is next. This AutoCAD operation allows you to start a drawing command relative to an existing point.
Tip - This command is especially useful when trying to place a riser a specified distance off the corner of a building, or for drawing a pipe a certain distance off of a wall. You must have started another command (i.e. Insert or Line) before using this button. Practice with it to get familiar with its behavior.

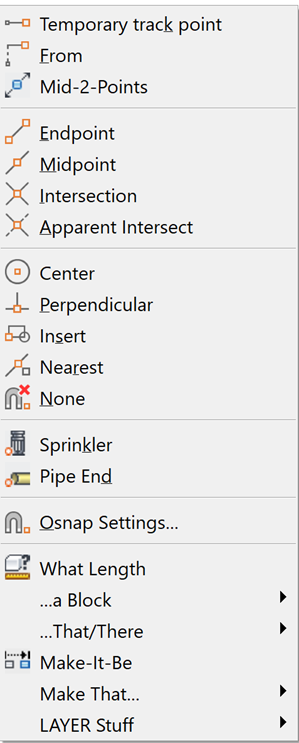
The next twelve buttons are single, common OSNAP settings. Included are the specialized HydraCAD OSNAPs for snapping to a Sprinkler or a Pipe End. They override the running OSNAP for a single selection, just like any other object snap. The HydraCAD OSNAPs are programmed to snap only to the objects they are named for, making it easy to avoid snapping to unwanted points.

The next two buttons are for saving and restoring your own favorite Object Snaps. Pressing Save Osnap will open the Drafting Settings dialog box where you can select your Osnap settings. Restore Osnap will re-establish your Save Osnap settings.
Tip - Occasionally you may find the HydraCAD changes the current object snaps. Use these buttons so you can get back to the ones you prefer.

The next button on the tool bar is for entering multiline text (MTEXT). This fly out contains options for entering single line text (DTEXT) as well.

The next button is a flyout for saving and restoring a default View. Saving such a view makes greatly reduces the amount of zooming necessary to get around a drawing.
Tip - Save a view of the floor or group of rooms you are currently working on. Any time you need to get back to those rooms, just pick Restore View, even in the middle of a command.

The next button is a flyout for commands to adjust the cross hairs and snap angles. Set Cross Hairs by Picking will set the cross hairs to the angle of a picked line, such as the steel in a building that is drawn at an angle.
Tip - This is especially useful if you have a building at, say, a 45 degree angle to normal. Just pick this command and then pick a piece of steel or a wall and all subsequent HydraCAD commands will work that this chosen angle. Use Reset Cross Hairs (explained below) to set the cross hairs back to 0 degrees.
Temporary Angle will set the cross hair angle by entering it at the command line. Reset Cross Hairs will return the cross hair angle to normal (East at 0 degrees)
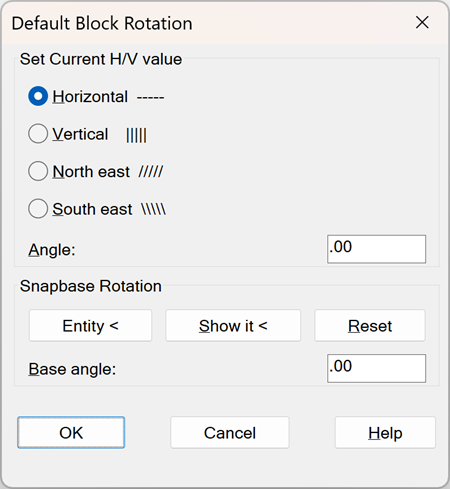
Rotation Base Setup will open a dialog box which contains all the above cross hair/angle commands. The top area is for setting the angle for inserted blocks. Set the reference line with the radio buttons. Enter an angle in the field. Any new blocks will be inserted at this angle. Blocks may include heads, lights, riser symbols, Etc.

Use the Snapbase Rotation area for setting the Crosshairs angle. Enter the Snap angle with the keyboard or use the buttons. Pick Entity and pick a line to inherit its angle. Use Show it and pick two points to define the angle. Reset will return the Snap angle to square. These commands are useful when your building is at an angle. All HydraCAD commands will adjust to this new angle.

The last flyout is for inquiry. The What Is It command is extremely handy. It will display the useful properties of objects in any easy to read format that is much simpler to read than the AutoCAD LIST command, and is tailored to what a sprinkler designer would like to know. What Length will calculate and display the length of objects. The Distance command activates the AutoCAD DISTANCE command.

The next two buttons access our help and knowledge base. When picked, they will launch the respective application with the last used HydraCAD command as the subject.

The final button is the ESCape button for canceling commands. This also resets many AutoCAD variables for HydraCAD use, such as the correct Pick Box and Aperture sizes, the proper Attribute Dialog (ATTDIA), Attribute Request (ATTREQ), Highlight (HIGHLIGHT), Dragmode (DRAGMODE) and File Dialog (FILEDIA) settings.

The HydraTools toolbar is located above the drawing area by default. If not present, it can be opened from the HydraTools pull down menu. The HydraTools commands are described in the HydraTools chapter of the HydraCAD V58/V57 User Manual.
Popup menus are also available. The HydraCAD popup menu (below) can be seen by holding the Shift key down and Right-clicking with the mouse over the drawing screen. This menu includes several popular AutoCAD and HydraCAD commands.

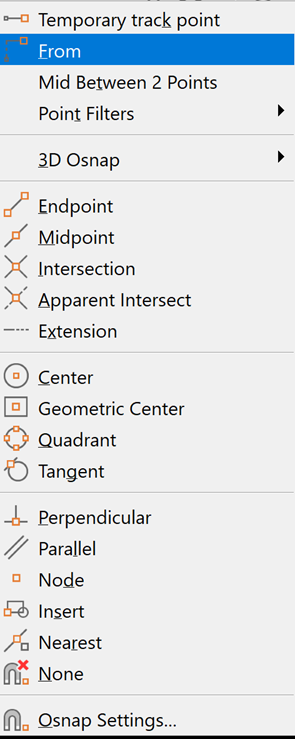
The standard AutoCAD popup menu (below) can be accessed by holding the Ctrl key down and Right-clicking.


 HydraDOCs