Appearance
New Tag

Layer(s) affected: SL01, DMN3, FAB_DEF
Alias: TN
Associated Commands: [Copy Tag]
HydraCAD Ribbon: Process Panel
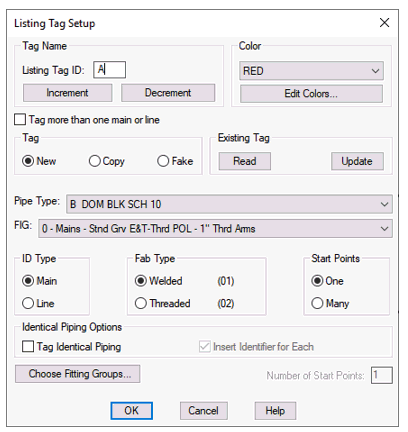
Used for creating and inserting AutoList tags into the drawing. These tags instruct AutoList how the piping should be fabricated. When you start the command the following dialog box will appear:

Input the Listing Tag ID. with the keyboard and select a Color from the list. The Default is [space]A. The space ensures that this tag will be listed first.
Press Edit Colors to get colors that do not appear in the list.
Press Increment or Decrement to add or subtract from the last ID.
The ID and color will be assigned to the next tag that you insert. Common practice assigns letters for mains and numbers for lines. A space is already part of the default ID of (space) A. As explained in the preface to this chapter, that ensures that mains will list before numbered lines, as long as a space is not used before the number assigned to a given line or riser nipple.
The ID and color will be associated with the Listing printouts after the data has been processed. For smaller jobs you may want to use only one tag and list the entire system under one ID and color. For larger jobs, you can break the system into listed areas, each having their own ID and color. Unique ID’s and colors are useful for pipe organization in shipping and assembly.
Check Tag more than one main or line if you want to continue to tag mains or lines, one after the other, with the same fabrication setup. The ID will be incremented by one each time you pick a new pipe. The main or branch line configurations do not have to be identical. The only requirement is that the fabrication scheme is the same for each main or line picked. The insert command will continue to ask you to pick the next pipe until you press Escape.
For the Tag, select from New, Copy, and Fake. If you select New, the next inserted tag will have the properties as set up with this dialog box. Use New whenever you want to label a different configuration of piping than that of one you have already tagged. If you select Copy, the next tag inserted will also have the properties as set up with this dialog box, except that it will be labeled as a duplicate tag, not a new one. Use this when you have multiple welded branch lines that all have the same configuration. Label the first one with a New designation and all the rest that are identical with a Copy designation.
The rules are straightforward:
You may only have one New tag with a given ID. Additional lines or mains of that same configuration should receive a Copy tag.
If using Copy tags, there must be one New tag with the same ID as the Copy tags.
*Tip* - If you need to tag many identical piping configurations, the best way is to choose the Tag Identical Piping option discussed later in this section.
A Fake tag is a special case and should not be used without checking with Hydratec. It is placed on a pipe that you don’t want to be listed.
The Existing Tag area of the box is for editing existing tags on the drawing. Use the Read button and select the listing (triangular) tag to see its properties. Use the Update button to change an existing tag’s properties to the values set in the Listing Tag Setup box.
The Pipe Type value corresponds to the type of pipe to be used for the line or main. Pick a type from the list. The Pipe Type list is read directly from the HydraLIST database.
The Fitting Instruction Group or FIG is used to specify the fabrication method for the line, main, or riser nipple about to be tagged. Select the method from the pull-down list. If you cannot find the appropriate fabrication method from this list, more are available through the Fitting Mapping command. This is started with the Choose Fitting Groups button. For more information on this, see the Fitting Mapping command later in this section.

Select Main or Line for the appropriate tag. The choice is mostly self-explanatory, except that welded branch lines are usually labeled with a Tag Type of Line. This choice has no bearing on the stocklist.
Select whether the fabrication will be Welded or Threaded (think of as Non-Welded).
*Tip* - Branch lines that use a threaded (non-welded) configuration such as Cast Iron, Ductile Iron or Malleable Black Screwed or if they are CPVC or Copper, do not need to be tagged. Instead, specify the listing method for these branch lines in the Default Branch Setup portion of the Start AutoList dialog box.
From Start Points, the most common selection should be One. There are some circumstances where more than one may be used. In this case, select Many and then enter the Number of Start Points with the keyboard. In the Listing examples which follow, there are cases where more than one Start Point is required.
Press OK to insert the tag. Pick a main, line, or riser nipple. If you pick a riser nipple, you will be prompted as to whether the tag is at the top or bottom. If you select top, the list will begin at the top of the nipple and travel down. If you select bottom, the list will begin at the bottom of the nipple and travel up.
If you selected Many, you will be prompted for more insertion points after the first tag is inserted until the Number of Start Points value has been used up.
After the Listing tag is inserted, you will be prompted to pick a location for the tag label. Pick an uncluttered area. The label does not play any role in the actual listing process and may be erased if required.
The Listing Tag Setup dialog box will automatically increase the Listing ID incrementally for each subsequent New Tag insertion.

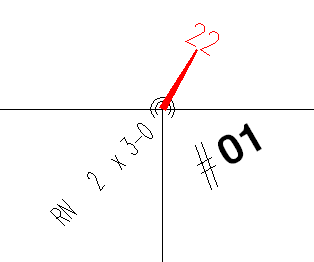
This example shows a Line Listing tag placed at the bottom of a riser nipple.
Use Tag Identical Piping to tag several pipes at once and Insert identifier for Each to place a tag label for each. See Listing Example 4 below for a demonstration of this feature.
HydraCARDs (Troubleshooting)
For HydraCARDs regarding New Tag: [Click Here]

 HydraDOCs