Appearance
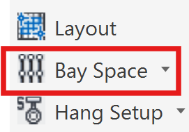
Bay Space

Layer(s): SPRNKS, SPRKDAT2
Shortcut: BS
Associated: Select Sprinkler / Insert Sprinkler / Lines
Ribbon: Insert Panel

Insert sprinklers and line piping within a specified bay.
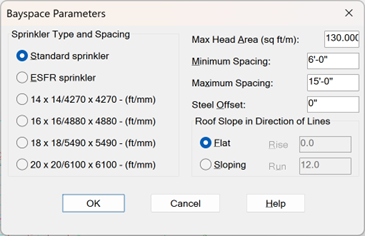
When you select Bay Space, the Bayspace Parameters dialog box will appear.

For the Sprinkler Type, select the sprinkler with the radio buttons. Set Max Area Coverage, Minimum and Maximum Spacing according to the hazard classification.
The Steel Offset refers to the minimum distance that the sprinklers will be installed relative to the joists and beams.
Pick Flat or Sloping roof. If the roof is sloping, enter the rise and run of the slope.
This will adjust the floor area so that the ceiling area does not exceed the chosen Max Area Coverage.
Tip - If you are in a jurisdiction that does not require that the floor area be adjusted, then choose a Flat configuration even if the steel is sloping.
If you do not have a sprinkler head already selected for insertion, you will be asked to pick one.
HydraCAD will prompt at the command line to pick the corners. Pick the diagonal corners of the bay.
When picking corners with steel columns, using the Insertion Osnap may be an advantage.
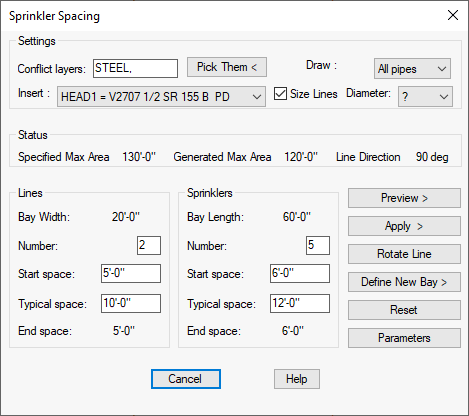
When the corners have been picked, the Sprinkler Spacing dialog box will appear.

The dialog box shows how HydraCAD has calculated the sprinkler layout with the previously specified coverage and spacing.
The Conflict layers area at the top of the box will show the default value of STEEL. This value includes all HydraCAD steel layers which might interfere with a sprinkler insertion. Sprinklers will not be placed on beams or joists.
If you have steel layers in addition to the layers provided by HydraCAD, for example those from a background drawing not created with HydraCAD and are concerned that they may interfere with the sprinklers, use the Pick Them button to pick and add them to the conflict list. You can also add these layer names by typing from the keyboard. The layer names must be separated by commas if you type them in.

Select whether you want to insert pipes or not with the Draw list. Check the box if you want the lines sized. Select a size from the list or use ?.
The Specified Max Area is the area of coverage entered previously. The Generated Max. Area is the sprinkler coverage with the spacing entered below.
The sprinkler that will be inserted is shown (HEAD1 for this example). This is the last head specified with the Select Sprinkler command. If you want another, select it from the Insert list.
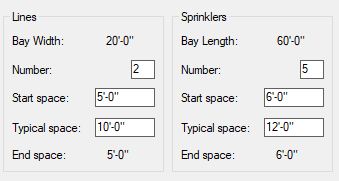
HydraCAD displays the calculated number and spacing between lines and sprinklers.

In this example, the number of calculated Lines is 2. The Start Space is the distance from the left bayline to the first branch line. The Typical space is the distance between the branch lines. The End space is the distance from the last branch line to the right bayline.
The Sprinklers area shows the number of calculated sprinklers per branch line. The Start space is the distance from the bottom bayline to the first sprinkler. The Typical space is the sprinkler spacing along the branch lines. The End space is the distance from the last sprinkler to the top of the bay.
You may accept the numbers and distances that HydraCAD has calculated, or type in your own values.
Use the Preview > button to see how the layout looks before actually inserting sprinklers and pipes. This is useful for optimizing a difficult layout.
When you are satisfied with the arrangement, press on the Apply > button and the sprinklers and lines will be inserted. The command will end.
Pressing the Rotate Line button will rotate the lines by 90 degrees. The resulting changes for numbers and spacing of lines and sprinklers will be displayed.
Define New Bay will allow you to pick the corners again.
Reset will re-calculate the spacing with the current values.
Pressing the Parameters button will take you back to the Bayspace Options dialog box. There you can adjust maximum spacing, distances, etc.
To exit Bayspace without inserting heads, press Cancel.
HydraCARDs (Troubleshooting)
For HydraCARDs regarding Bay Space: [Click Here]

 HydraDOCs