
 HydraDOCs
Appearance
Select Plot Layers
Layer(s): Various
Shortcut: SPL
Ribbon: Cleanup Panel
Turn Off and On useful layers in preparation for a plot. Layers that are unnecessary or cause congestion such as Construction Walls, pre-Hydraulic tags, and pre-Listing tags are turned off. Important layers are turned on. The pipe layers are turned off in favor of Pretty Pipes.
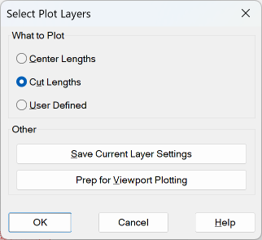
Select Center to Center to turn on the center-to-center pipe lengths and turn off all Cut Lengths. Select Cut Lengths to do the opposite.
Select User to choose a script file you previously created from HydraTools > Layer Control > Save On/Off Status.
Prep for Viewport Plotting contains five pre-defined 'groups' of layers to turn on/off. See instructions below for their use.
Prep for Viewport Plotting
These will help plot a drawing with the HydraCAD layers prominent and dark. Other layers can be set by the user to plot Dark, Medium or Light gray tones. A Layer Group can be used in a layout tab viewport to set how that viewport will be plotted. You will also have the ability to plot center to center pipe dimensions in one viewport and cut pipe dimensions in another viewport on the same layout tab.
The HydraCAD Layer Groups:
HydraCAD 1 - Sprinkler Plan – Center Lengths (Standard Plan View Plot) HydraCAD plot layers will be set similar to picking Select Plot Layers and Center to Center. All other non-HydraCAD layers will be set to plot in the gray tone intensity selected.
HydraCAD 2 - Sprinkler Plan - Cut Lengths (Standard Plan View Plot) HydraCAD plot layers will be set similar to picking Select Plot Layers and Cut Lengths. All other non-HydraCAD layers will be set to plot in the gray tone intensity selected.
HydraCAD 3 - System Model Sections and 3D Details (Cross Sections and Isometric Details) will set plot layers to only those HydraCAD layers required for the System Model and the 3D Details. All other non-HydraCAD layers will be set to plot in the gray tone intensity selected.
HydraCAD 4 - 3D Details (Riser Details and Pump Rooms) will set plot layers to only those HydraCAD layers required for the 3D Details. All other non-HydraCAD layers will be set to plot in the gray tone intensity selected.
HydraCAD 5 - Plot All HydraCAD Layers (All HydraCAD Layers) This Group has all HydraCAD layers set to be active plotting layers. You can edit this Layer Group to create additional custom Layer Groups. (See: How to edit a Layer Group) All other non-HydraCAD layers will be set to plot in the gray tone intensity selected.
Pre-Plot Drawing Requirements
Run Pretty Pipes
While in Model Space, start the Select Plot Layers command
In a Layout Tab, create as many viewports as necessary for the system layout to be plotted
Applying Layer Group Settings to a Viewport
Pick inside a viewport to make it active. Then, pick the Select Plot Layers (SPL) button.
Make a selection from the Type of Plot for Current Viewport drop-down to be plotted in the active viewport.
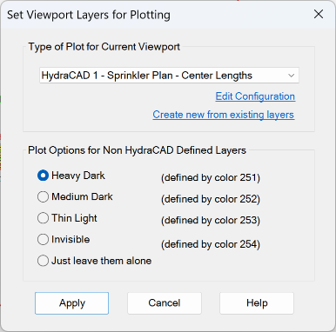
Then, select one of the Plot Options for Non HydraCAD Defined Layers. This selection will determine the gray tone intensity for all non-HydraCAD Defined Layers to be plotted.
The (defined by color xxx) choices have been assigned to plot in various gray tones when using the HydraLayerGray.ctb plot style table.
When you have made your choices, pick Apply.
Repeat the Select Plot Layers command for each viewport in the layout tab. Once all viewports have been set, the drawing layout may be plotted.
Plotting Using the Layer Group Settings in a Viewport
Use the Plot command to specify the device and media settings and to plot your drawing. Set the Plot Style Table (pen assignments) to HydraLayerGray.ctb. Set all other plot dialog box settings as required for the Printer/plotter and paper size.
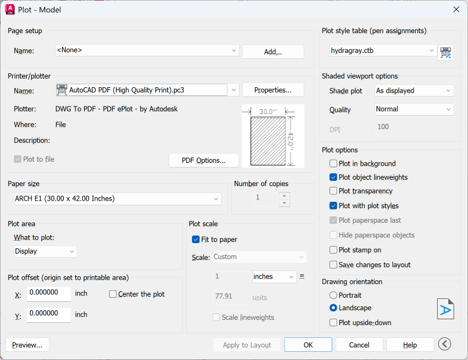
The HydraLayerGray.ctb Plot Style Table is required in order to plot a drawing with HydraCAD layers prominent and dark while other layers plot Dark, Medium or Light gray tones based on the Layer Group Settings for each viewport. Now, you can preview and plot the drawing.
Limitations of the Layer Group Settings
There are several limitations when plotting using the Layer Group Settings. This function changes the color of all non-HydraCAD layers to colors as selected by the user. Then the pen assignments in the HydraLayerGray.ctb file makes all non-HydraCAD layers plot to dark, medium or light gray tones or invisible based on "layer" color settings. Therefore, all non-HydraCAD drawing entities must get their color assigned BY LAYER in order to generate the expected gray tone plot.
AutoCAD allows drawing entities to have their colors assigned BYLAYER, BYBLOCK or by being drawn with a particular color. It can be difficult to make acceptable pen assignments for plotting entities drawn BYBLOCK or drawn in a particular color. Entities drawn with or changed to a specific color (i.e. RED) retain their original COLOR when their layer colors have been changed by the Layer Group Settings. Blocks that are created with their color set to BY BLOCK will also retain their original BY BLOCK color when their layer colors have been changed. In both cases the non-HydraCAD drawing entities will not generate the expected gray tone plot.
Editing a Layer Group
Start Select Plot Layers and pick a viewport.
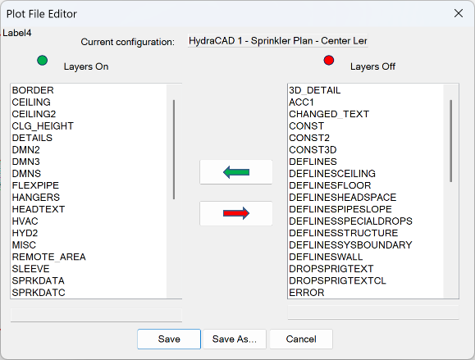
Pick the Type of Plot for Current Viewport group to edit. Then, pick Edit Configuration. The Plot File Editor dialog box will display the intended layers to be plotted and those that are not.
The HydraCAD layers to be plotted are in the Layers On column. The HydraCAD layers that will not be plotted are in the Layers Off column.
To add a HydraCAD layer to the "Layers On" column select the layer name from the Layers Off column and pick the green arrow. To remove a HydraCAD layer from the Layers On column select the layer name and pick the red arrow.
Save your changes when the Layers On configuration has been set as you require. Select the Save button to save the revised group to the same name.
Select the Save As… button to save the revised group with a different name.
Creating a New Layer Group
Method 1 - Pick Create new from existing Layers. Set layers to be On and Off as described above. Pick the Save As… button to save the new group with the name of your choice.
Method 2 - Select the Plot All HydraCAD Layers group from Type of Plot for Current Viewport and pick Edit Configuration. Set layers to be On and Off as described above. Pick the Save As… button to save the revised group with a different name.
HydraCARDs (Troubleshooting)
For HydraCARDs regarding Select Plot Layers: [Click Here]