Appearance
Auto Hang

Layer(s) affected: HANGERS, STEEL*
Alias: AH
Associated Commands: [Setup]
An automatic routine for inserting multiple hangers within a specified area.

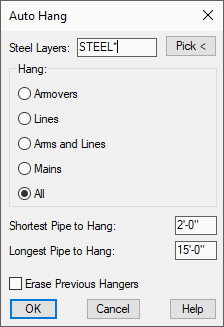
When you start the command, the box here will appear. Select Armovers, Lines, Armovers and Lines, Mains, or All from the box. If the lengths are Computer Generated, and the same type of hanger is used, select All. Otherwise, insert Lines and Mains separately.
By default, Auto Hang will reference the HydraCAD steel layers, as represented by the STEEL* in the Steel Layers edit box.
If you have steel layers in addition to or different from the layers provided by HydraCAD, for example those from a background drawing not created with HydraCAD and are concerned that they may interfere with the sprinklers, use the Pick Them button to pick and add them to the list. You can also add these layer names by typing from the keyboard. The layer names must be separated by commas if you type them in.
If you want existing hangers erased before the new ones are inserted, check the Erase Previous Hangers box. Enter values in the Shortest or Longest Pipe to Hang fields. HydraCAD will not insert hangers on any pipes shorter or longer than these values.
When the box has been set up, press OK. Press Enter to process all of the pipes visible in the editing screen or pick the pipes with a window. The routine will identify pipes for processing and ignore all other layers.
The first priority for the program is to place hangers where the steel intersects with the pipe if this point is close to the midpoint of the pipe. If this is not the case, hangers will be inserted at the midpoints of the pipes. All other selected pipes will receive one hanger. You should always double-check the layout generated by this command. In many cases you will have to insert more to meet building codes. In some cases, there are excess hangers that can be removed.
HydraCARDs (Troubleshooting)
For HydraCARDs regarding Auto Hang: [Click Here]

 HydraDOCs